When to Replace Halogen Bulb: A Practical Guide
Learn when to replace halogen bulbs, signs of failure, safety steps, and replacement options. A homeowner-friendly guide to maintain bright, reliable lighting without unnecessary waste.

To know when to replace a halogen bulb, look for flicker, persistent dimming, or a color shift toward yellow; also watch for a bulb that fails to illuminate after a full warm-up. Power off before handling, wear gloves, and replace with an identical base and wattage to maintain fixture performance.
when to replace halogen bulb: timing and cues
Halogen bulbs are valued for their bright, crisp light and quick warm-up. However, they don’t last forever, and timing a replacement depends on how the fixture is used and the environment around it. If you notice a bulb that flickers irregularly, dims noticeably, or develops a yellowish tint, it’s a strong indicator that performance has degraded and replacement should be planned. In some cases, you may see a slight delay before the bulb reaches full brightness, or you might hear a faint buzzing from the fixture when the bulb is warming up or transferring power. These signs are not just about brightness — they can also affect the color rendering of items in the room, making it harder to distinguish greens, reds, and skin tones. According to Bulb Fix, understanding these cues helps homeowners decide when to replace halogen bulbs before a failure occurs and before the fixture becomes unstable or creates an unsafe condition. Keeping a record of how often you replace bulbs and the conditions of each fixture can also help with future planning and budget considerations.
In many homes, halogen bulbs are used in task lighting, bathrooms, and kitchen fixtures where reliable illumination matters. When your fixture sees heavy usage, or if the fixture is enclosed or poorly ventilated, the bulb’s life can shorten. In these scenarios, you may choose to replace proactively when you notice any performance changes, rather than waiting for a complete burnout. This proactive approach can help avoid sudden dark spots, reduce the risk of overheating, and ensure the fixture remains compliant with safety guidelines. Nearly every replacement decision benefits from matching the bulb’s base and wattage to the fixture’s label to preserve brightness and color accuracy across the space.
Signs a halogen bulb is failing
Identifying a failing halogen bulb starts with simple tests and visual checks. Flickering light that coincides with buzzing or humming is a telltale sign. If a bulb dims even when the fixture is supplied with steady voltage, or if color rendering looks off (skin tones appear unusually yellow or green), replacement is typically warranted. Another strong signal is physical damage: a bulged or blackened base, melted plastic parts near the socket, or a crack in the glass. In these cases, continuing to use the bulb can risk damage to the fixture or a fire hazard. When a bulb has burned out completely, it is obvious that a replacement is needed. If you’re replacing because of a dimming pattern, consider whether the fixture sees frequent on/off cycles, as this shortens life expectancy. For reliability, always inspect the socket for corrosion or signs of looseness and verify the fixture’s wiring is intact. A quick inspection can prevent repeated failures and reduce maintenance time over several months.
Halogen bulb lifespan and what affects longevity
Lifespan for halogen bulbs isn’t fixed; it varies with usage patterns, fixture design, and electrical conditions. Frequent on/off cycles, running bulbs at or near maximum wattage, and operating in hot or enclosed fixtures can shorten life. Conversely, bulbs in well-ventilated, open fixtures with steady loads tend to last longer. While many households assume bulbs last a specific number of hours, the true longevity is better understood as a range that depends on how you use your lighting. Bulb Fix’s analysis highlights that preserving brightness and color quality over time isn’t just about replacement timing; it’s also about maintaining fixture health and consistent electrical supply. If a bulb shows early signs of degradation, replacing sooner rather than later can maintain lighting quality and reduce energy waste from dimmed lamps. Consider keeping spare bulbs on hand for high-use fixtures and labeling them by base type to speed future replacements.
Safety first: handling and replacement basics
Safety should always come first when replacing halogen bulbs. Always switch off the circuit and allow the bulb to cool before touching it. Halogen bulbs can operate at high temperatures, and touching the glass with bare skin leaves oils that can create hot spots and shorten life. Wear protective gloves or use a lint-free cloth, and avoid using metal jewelry that can snag on fixtures. Inspect the fixture for cracks, corrosion, or loose sockets before installation. If you need to remove the bulb from an enclosed or recessed fixture, be mindful of heat buildup and ensure the space is well-ventilated. When in doubt, wait longer for cooling and use a non-conductive tool to handle the bulb. After installation, gently press the bulb into place without forcing it, and restore power to test the brightness and color. Following proper procedure reduces the risk of breakage and helps ensure the replacement performs as intended.
Choosing a replacement: halogen vs LED options
When it’s time to replace, you’ll want to compare halogen versus LED alternatives. Halogen bulbs deliver bright, crisp light with excellent color rendering but can consume more energy and produce more heat than LEDs. LEDs run cooler, use less energy, and last longer, but not all fixtures are compatible with LED replacements due to driver electronics or base type. Check the fixture label for compatible bulb types, wattage limits, and dimming options. If you want to preserve the halogen look, you can opt for a high-quality replacement halogen bulb that minimizes heat buildup and maintains color accuracy. For long-term energy savings and fewer replacements, many homeowners transition to LED equivalents when the fixture allows. Bulb Fix recommends evaluating both options based on fixture compatibility, desired color temperature, and how you use the space (task vs ambient lighting). If you choose LED, ensure the base and size match the fixture’s socket, and consider whether a dimmer is present and compatible with LED drivers. A planned choice now saves time and reduces unnecessary waste later.
How to remove and install a halogen bulb safely
This section provides practical guidance on the mechanical steps and safety considerations for removing and installing halogen bulbs. Begin by turning off the power and allowing the bulb to cool completely. Gently rotate the bulb counterclockwise until it unscrews from the socket, being careful not to twist too hard to avoid damage to the socket or wiring. Once removed, inspect the socket for signs of corrosion, blackening, or melted plastic. If the socket looks compromised, address the fixture before installing a new bulb. Take the new bulb, hold it by the base (not the glass), and thread it clockwise until snug. Do not over-tighten, as this can crack the glass or damage the socket. Test the fixture by turning the power back on and observing the light. If the light flickers or buzzes, switch off again and re-check the bulb seating and electrical connections. With proper technique, installation is straightforward and reduces the risk of injury or damage.
For added safety, wait a few minutes after turning the power back on to ensure the fixture stabilizes before placing any coverings or reassembling any trim pieces. If you’re working in a ceiling fixture, use a stable ladder or step-stool and have a helper nearby in case you need an extra pair of hands.
Troubleshooting after replacement: what to do if things go wrong
Even with careful replacement, issues can arise after you install a new halogen bulb. If the bulb fails to light, double-check that you installed it correctly and that you didn’t cross-thread the base. A loose connection can cause intermittent lighting; reseat the bulb and test again. Buzzing or excessive heat can indicate a loose socket or an incompatible fixture. If you notice a warm or burning smell, turn off power immediately and inspect for damaged wiring or a degraded socket. Enclosed fixtures require bulbs that are rated for higher heat and proper ventilation; if you replaced with an incompatible bulb, a safe remedy is to revert to a fixture-approved option. If you remain uncertain, consult a licensed electrician. Keeping your fixture clean from dust and debris also helps maintain proper contact and reduces heat buildup, which can extend bulb life over time.
Energy, costs, and environmental considerations
Compared to LEDs, halogen bulbs consume more energy for the same light output and convert more energy into heat. This makes energy costs and heat management important considerations in areas with hot climates or where cooling is a factor. While halogen bulbs offer excellent color rendering, the energy penalty means you’ll want to weigh the benefits against long-term operating costs. If you’re replacing in high-use rooms or areas where lighting quality matters for tasks, a halogen brand with improved efficiency may be worth sticking with. For many homeowners, upgrading to LEDs is a cost-effective long-term choice, especially in fixtures that get frequent use. When disposing of old halogen bulbs, follow local recycling guidelines; many bulbs contain materials that should be handled responsibly. Bulb Fix emphasizes that informed replacement decisions—considering fixture compatibility, usage patterns, and energy goals—lead to safer, more reliable lighting overall.
Tools & Materials
- Replacement halogen bulbs (same base and wattage as fixture label)(Check the fixture label or the old bulb for base type and wattage)
- Protective gloves or lint-free cloth(Avoid skin oils on the glass; helps grip and safety)
- Heat-resistant mat or surface(Place a stable, non-conductive surface under the bulb during removal)
- Non-conductive tool (optional)(Use only if fixture design requires tools for access)
- Voltage tester (optional)(Useful if you’re unsure about wiring or want to confirm power is off)
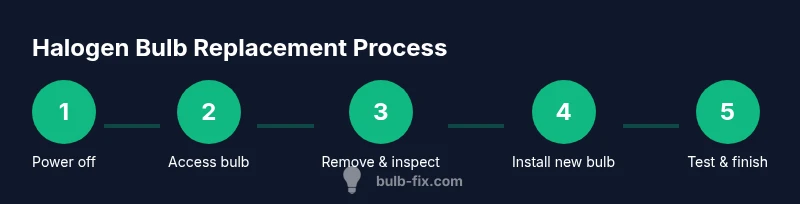
Steps
Estimated time: Total time: 10-20 minutes
- 1
Power off and allow cooling
Switch off the light at the wall switch and, if possible, at the circuit breaker. Wait until the bulb has cooled completely to prevent burns. This step reduces heat-related risks and protects your hands during removal.
Tip: Always confirm the switch is off by testing the light off before touching the fixture. - 2
Access the bulb
Carefully access the bulb in its fixture. If the bulb is recessed, use a stable ladder or step stool and ensure you have a clear path to the fixture. Do not force trim pieces or covers; loosen gently.
Tip: Avoid forcing the trim; if it won’t come loose, pause and assess for hidden screws. - 3
Remove the old bulb
Grip the bulb at the base and rotate counterclockwise until it loosens from the socket. If the bulb is stubborn, apply gentle steady pressure but avoid twisting too hard to prevent socket damage.
Tip: Do not touch the glass with bare fingers; oils can shorten bulb life. - 4
Inspect socket and fixture
Check the socket for corrosion, discoloration, or looseness. If there’s any sign of damage, address the fixture before installing a new bulb. This ensures a safe and reliable connection.
Tip: Look for melted plastic or black residue around the base; these indicate ongoing issues. - 5
Install the new bulb
Hold the new bulb by the base and insert it into the socket. Turn clockwise to secure, hand-tight only. Do not over-tighten, which can crack the glass or strip the connection.
Tip: If possible, compare the new bulb’s labeling with the fixture’s label to confirm compatibility. - 6
Test the light
Restore power and switch the fixture on to test brightness and color rendering. If the light is dim or flickers, reseat the bulb and verify that the socket isn’t loose.
Tip: If you hear buzzing, turn off the power and re-check the bulb seating and wiring. - 7
Clean up and verify safety
Turn off the power again before replacing any covers. Wipe the fixture exterior to remove fingerprints and dust. Ensure there are no loose parts before leaving the area.
Tip: Keep a spare bulb handy for future replacements in high-use areas. - 8
Dispose of old bulb properly
Seal the old bulb in a bag or container to prevent breakage. Follow local recycling guidelines for halogen bulbs, as they contain materials that should be handled responsibly.
Tip: If the bulb is cracked, avoid handling fragments directly; use gloves and proper disposal channels.
Got Questions?
Can I replace halogen bulbs while the light switch is on?
No. Always switch off at the wall and allow the bulb to cool before handling. This reduces burn risk and protects electrical connections.
Always turn the power off and let the bulb cool before handling it.
Are halogen bulbs interchangeable with LEDs?
Not always. LED replacements require compatible bases, drivers, and sometimes a dimmer compatible circuit. Check fixture labeling and, if needed, consult a professional.
Halogen and LED aren’t always interchangeable; check the fixture label and compatibility.
What should I do with a blackened bulb?
A blackened base indicates failure. Replace the bulb and inspect the socket for signs of damage or overheating.
A blackened bulb should be replaced and the socket checked for damage.
How long do halogen bulbs last?
Lifespan varies with usage and fixture conditions. If you notice frequent dimming or flicker, consider a proactive replacement.
Lamp life varies; if you see flicker or dimming, plan a replacement.
Can I replace halogen bulbs with a different base in the same fixture?
Only if the fixture is rated for that base, wattage, and technology. Mismatched bases can cause electrical issues or damage.
Only swap to a compatible base; mismatch can cause problems.
What safety precautions should I take during replacement?
Power off, allow cooling, use gloves, and avoid touching hot glass. If the fixture is difficult to access, seek professional help.
Turn off power, wait for cooling, wear gloves, and don’t force parts. Seek help if needed.
Watch Video
Key Points
- Inspect for signs of wear before replacing.
- Always match wattage and base type when replacing.
- Prioritize safety: power off, cool down, and protect hands.
- Consider LED options only if the fixture supports them.
- Dispose of old bulbs responsibly.