How to Repair LED Bulb Without a Multimeter: A DIY Guide
Learn safe, practical steps to diagnose and repair an LED bulb without a multimeter. Visual checks, cleaning, reseating, and replacement guidance for homeowners and DIY enthusiasts.

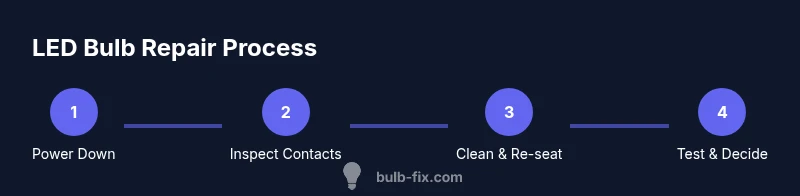
You can troubleshoot an LED bulb without a multimeter by safely unplugging the fixture, performing visual checks, reseating the bulb, and cleaning contact points. If the bulb remains unreliable, test with a known-good driver or replace the bulb. This approach emphasizes safe handling and simple, observable checks rather than electrical measurements.
Why LED Bulb Repairs Without a Multimeter Are Common
When a household LED bulb fails, many homeowners wonder whether a multimeter is required. In practice, a large portion of LED issues are due to loose connections, heat-related stress, or dirty contact points rather than a defective LED die. According to Bulb Fix, these problems are highly amenable to safe, tool-light diagnosis that you can perform at home. The keyword for today is how to repair led bulb without multimeter, and the aim is to give you a practical, step-by-step mindset: observe, reseat, clean, and decide. By focusing on observable clues and safe handling, you can often restore operation without specialized equipment. This approach also reduces waste and empowers you to take control of common lighting maintenance tasks.
Safety: Power Down and Prepare for Handling
Before you touch any lighting components, ensure the fixture is completely powered down. Unplug the lamp, switch off the circuit breaker if necessary, and allow any capacitors to discharge. A non-contact voltage tester can be used to double-check that no live current is present, which minimizes risk when removing the bulb. Wearing safety glasses and gloves is a prudent precaution to protect against sharp edges and heat during disassembly. By taking these precautions, you create a safe baseline for visual inspection and gentle handling without a multimeter.
Visual Diagnosis: What to Look For
Visual inspection can reveal the most common culprits: loose bases, corroded contacts, burn marks, or cracked lenses. A flickering bulb often points to a marginal electrical contact rather than a failed LED die. Look closely at the base—whether it’s a standard Edison screw or a pin-base type—and check for residue, corrosion, or bent terminals. Check the fixture socket for wear or damage as well. If you notice any of these signs, plan to reseat and clean rather than force repairs that might compromise safety.
Cleaning Contacts and Re-Seating the Bulb
Dirty contact surfaces can significantly impede current flow. Use a small amount of isopropyl alcohol (70%) on a lint-free cloth or cotton swab to gently wipe the metal contact points in the bulb base and socket. Allow the area to dry completely before re-inserting the bulb. When you reseat, rotate gently to ensure a snug, even connection across all contact points. Clean seating surfaces in both the bulb and fixture to minimize future oxidation and improve reliability.
Driver and Bulb vs. Driver-Only Failures
Some LED bulbs rely on an internal driver module that can fail independently of the LED array. If reseating and cleaning do not restore operation, the issue may lie with the driver or with a compatibility problem between the driver and the fixture. In those cases, you have two practical paths: replace the bulb with a compatible model or, if your fixture allows, substitute a known-good driver (if your design permits). Remember, replacing a driver inside a sealed LED bulb is generally not practical for DIYers, and a whole-bulb replacement is often the safer route.
Testing Without a Multimeter: Practical Approaches
Without a meter, testing is about substitution and observation. Swap the suspect bulb with a known-good bulb in the same fixture to see if the issue follows the bulb or the fixture. If the replacement works, the original is likely faulty; if not, the problem may be with the fixture’s socket, power supply, or wiring. If your fixture supports a different bulb type with a similar base, try that option to confirm compatibility. Keep your observations organized so you can reproduce your reasoning later.
When to Replace Instead of Repair
Many LED bulb faults are not safely repairable at home, especially when the problem involves sealed drivers or integrated electronics. If you observe obvious damage, persistent flicker after reseating, heat-related discoloration, or a burnt smell, it is generally safer and more cost-effective to replace the bulb or the fixture. Bulb Fix recommends prioritizing safety and reliability: if in doubt, replace rather than attempt risky disassembly. A new bulb with appropriate ratings may be the most reliable long-term solution.
How to Choose a Replacement or Driver (If You Decide to Swap Components)
If you opt to replace components, ensure the replacement matches the fixture’s voltage, base type, and lumen output. For integrated LEDs, you’ll typically replace the entire bulb rather than a driver. When selecting a replacement, check compatibility with dimmers, color temperature, and the fixture’s current rating. Favor reputable brands and verify certifications (such as energy efficiency marks) to ensure safety and performance. Documentation from the Bulb Fix team can guide choices, especially for common household sockets.
Practical Considerations for Heat and Ventilation
LEDs generate heat, and poor heat dissipation can mimic or accelerate failure. Inspect any heat sinks or venting on the bulb and fixture; clean any dust buildup that blocks airflow. Ensure the lamp is in a space with adequate ventilation and away from enclosed fixtures that trap heat. Poor ventilation can lead to reduced lifespan and intermittent operation, so consider relocating or upgrading to an LED bulb with better thermal management if you notice excessive heat.
In-Fixture vs. Lamp-Base Scenarios: Real-World Scenarios
In fixed ceiling fixtures, you may encounter more crusted contact surfaces due to age and dust. In lamps or portable fixtures, the socket contact may wear more quickly from frequent handling. In both cases, the core approach remains—unplug, inspect, clean, reseat, and test using a known-good reference. Document any fixture-specific quirks, such as how tight the base feels or whether a particular orientation affects performance. This practical, methodical approach helps homeowners build confidence over time.
Preventive Tips: Extend LED Life and Reduce Maintenance
To reduce the frequency of home LED repairs, practice good heat management, use compatible bulbs with fixtures, and avoid rapid on-off cycling. Keep fixtures clean and dust-free to maintain effective heat dissipation. Store spare bulbs and drivers in a cool, dry place and label the fixture types and base sizes for quick future reference. Regular LED maintenance, even if simple, can prevent small issues from becoming bigger problems.
Quick-Start Checklist Before You Begin
Use this at-a-glance checklist to prepare for LED bulb repairs without a multimeter: unplug the power; inspect the bulb and socket for obvious damage; clean contacts with isopropyl alcohol; reseat firmly; test with a known-good bulb or driver; replace the bulb or fixture if issues persist. A methodical approach minimizes risk and maximizes your chances of a successful repair.
Tools & Materials
- Safety gear (safety goggles and insulated gloves)(Protect eyes and hands during inspection and handling.)
- Non-contact voltage tester(Optional but recommended to confirm power is off.)
- Screwdriver set (PH2 and flathead)(For opening bulb housing and fixtures.)
- Isopropyl alcohol (70%)(Use to clean metal contact surfaces; allow to dry completely.)
- Lint-free cloth or cotton swabs(Gentle cleaning without leaving fibers.)
- Replacement LED bulb or compatible driver(Have spares on hand in case of failure after inspection.)
- Soft brush or compressed air (optional)(Remove dust from sockets and vents.)
- Multimeter (optional)(Not needed for basic checks but useful for confirmation.)
Steps
Estimated time: 30-60 minutes
- 1
Power down and unplug
Ensure the fixture is completely disconnected from power. If you can access the circuit breaker, switch it off there as well. This step is essential to prevent electric shock while you inspect the bulb and fixture.
Tip: Double-check with a non-contact tester before touching any components. - 2
Access the bulb housing
Carefully remove the bulb from its socket by holding the base, not the glass, and twisting or pulling as needed according to the base type. If the bulb is stuck, apply a small amount of gentle pressure and avoid forcing it. Document orientation if you plan to reinstall.
Tip: Back off gently if you encounter resistance; forcing can crack the glass or damage the socket. - 3
Inspect for visible damage
Look for scorch marks, bent contacts, cracks in the glass, or loose wiring. If you see any signs of heat damage or corrosion, plan for replacement rather than repair. This step helps differentiate cosmetic issues from electrical faults.
Tip: If corrosion is present, avoid touching the area with bare skin and handle it with care. - 4
Clean contacts and reseat
Dampen a lint-free cloth with 70% isopropyl alcohol and wipe the metal contact points in both the bulb base and the socket. Let everything dry fully before reinserting the bulb. Reseating ensures a solid electrical connection and can fix intermittent flickers.
Tip: Do not use excessive liquid; just dampen the cloth and avoid touching other components. - 5
Test with a known-good reference
If possible, swap in a replacement bulb or known-good driver in the same fixture to see if the issue follows the component. If the replacement works, the original is likely faulty. If not, the problem could be the fixture or wiring.
Tip: Keep track of which component you tested first to maintain a clear path of diagnosis. - 6
Decide on replacement path
If cleaning and reseating do not restore reliability, consider replacing the bulb or fixture. For integrated drivers, a full bulb replacement is usually safer and more reliable than attempting to service the internal electronics.
Tip: Prioritize safety and reliability; sometimes replacement is more economical in the long run.
Got Questions?
Can I repair an LED bulb without any tools?
Yes, for many common issues you can perform basic visual checks, reseat the bulb, and clean contacts using simple non-powered steps. This approach avoids specialized equipment while reducing risk when done safely.
Yes. Start with a careful visual check, reseat the bulb, and clean the contacts. This usually fixes minor contact problems without tools, but always prioritize safety.
Is it safe to open an LED bulb to inspect the driver?
In most cases, opening a powered LED bulb is not recommended. If you must inspect, ensure power is off and the bulb is designed to be opened by consumers. Sealed designs often require replacement rather than internal inspection.
Only if the bulb is designed to be opened and power is fully off. Otherwise, replacement is the safer option.
What should I do if the bulb still flickers after cleaning?
If flickering persists, the issue may be the driver or fixture compatibility. Try a known-good bulb in the same fixture to confirm, and consider replacing the bulb or fixture if the problem follows the fixture.
If it still flickers, check the driver or compatibility by using a known-good bulb in the same fixture.
Can I test the LED driver without a multimeter?
Testing a driver without a meter relies on substitution: swap in a known-good driver or bulb and observe performance. A precise electrical test generally requires a meter or professional equipment.
Substitute with a known-good driver or bulb to observe performance; precise testing usually needs a meter.
When is replacement the better option than repair?
Replacement is often safer and more reliable for integrated LEDs or when there are signs of heat damage, corrosion, or burning smells. It also saves time and reduces risk compared to attempting risky internal repairs.
If you see heat damage or persistent failure after basic checks, replacement is usually the safer option.
Watch Video
Key Points
- Power down before inspection.
- Visual checks can identify most issues.
- Clean and reseat contacts to restore connection.
- Use a known-good reference to diagnose.
- Replace the bulb or driver if faults persist.