How to Change Bulbs Safely: A Step-by-Step Guide
Learn how to change bulbs safely with a practical, step-by-step guide. This Bulb Fix tutorial covers bulb types, compatibility, safety tips, disposal, and energy savings.

According to Bulb Fix, learning how to change bulb for common fixtures starts with safety and compatibility. This quick guide outlines identification, power-down steps, removal, and proper replacement. For safety, switch off the circuit at the breaker, avoid pulling on glass, and verify base compatibility and wattage. Whether you’re tackling a kitchen can light or a porch lantern, the fundamentals stay the same: know your bulb, protect yourself, and verify the fixture's requirements.
Why Safety Matters When Changing Bulbs
When you consider how to change bulb for common household fixtures, safety must come first. Most bulb-related injuries occur when surfaces are still hot, the bulb is fragile, or the power is accidentally still live. Before you touch anything, turn the room lights off and, if possible, switch off the circuit at the breaker. Let bulbs cool for a few minutes; hot glass can cause burns or shatter if gripped too firmly. In enclosed fixtures, heat can build quickly, which can shorten bulb life or damage the fixture. The Bulb Fix team emphasizes careful handling and deliberate, measured actions to prevent risks. A steady stance on a sturdy ladder or step stool is essential; never stand on furniture to reach high fixtures. Wearing gloves adds a layer of protection against sharp edges and helps keep oils from your skin off the bulb.
Safety also means planning for potential breakage. Keep a bucket or thick paper nearby to catch shards, wear eye protection if you suspect a bulb might break, and have a flashlight to inspect sockets in dim corners. If you are unsure about your fixture’s maximum wattage or base type, stop and consult the manual or a professional. The bottom line is to prioritize personal safety, verify fixture compatibility, and work in a dry, clear space. For context, a calm, methodical approach reduces risk and makes the replacement easier and quicker in the long run.
noteType:null],
Bulb Types and Base Compatibility
Bulbs come in several families and base types, and the base is what determines whether a bulb fits and functions correctly. The most common residential base in the United States is the standard medium screw base, often labeled E26, which is compatible with many ceiling fixtures, table lamps, and recessed lighting adapters. In Europe, you’ll encounter E27 bases, which are similar but sized for different sockets. For directional lighting or spotlight fixtures, you may encounter GU10, GU5.3, or MR16 bases that require different pin configurations. Bayonet bases such as B22 are still used in some regions and in some decorative fixtures. When selecting a new bulb, always check both the base and the shape—A19, PAR38, BR30, and other shapes indicate how the light disperses and where it’s best used.
Beyond base size, consider wattage and technology. Incandescent bulbs provide warm color but consume more energy, while LEDs offer energy efficiency and long life. If your fixture has a dimmer, you’ll want a dimmable bulb and, ideally, verify that the dimmer is compatible with LED or CFL bulbs. Enclosed fixtures or fixtures with sensitive electronics may require bulbs designed for enclosed spaces or specific dimming standards. A quick tip: if you’re uncertain, take the old bulb with you when shopping to match the base and size. Always compare the rated wattage on the fixture label and the bulb packaging. Brand guidance from Bulb Fix suggests prioritizing base compatibility and fixture limitations to minimize risk and maximize bulb life.
noteType: null],
Tools, Gear, and Workspace Setup
Having the right tools and a stable workspace makes changing bulbs straightforward and safer. Gather your essential items before you start to prevent mid-task trips. A reliable ladder or step stool with non-slip feet is essential for ceiling fixtures. A pair of work gloves protects your hands from sharp edges and from skin oils transferring to the bulb. A clean, dry surface prevents slipping and keeps your tools handy. A small flashlight helps you inspect sockets in dim corners and confirms you’re handling the correct bulb base. If you’re replacing a bulb in a high-traffic area, consider using a utility knife or a screwdriver only if required to open a fixture cover; otherwise, avoid prying. Finally, keep a container or bag handy for discarded bulbs if you are replacing multiple units. Safety glasses are recommended if you’re concerned about potential glass breakage, especially when working with older fixtures.
In practice, organizing your tools and workspace reduces time pressure and mistakes. Prepare an extra bulb of the same type in case one fails during testing, but avoid leaving bulbs exposed to dust or moisture. This approach aligns with best practices highlighted by Bulb Fix for a clean, efficient bulb swap.
noteType: null],
Common Scenarios and Quick Fixes
Different fixtures call for slightly different handling. For a standard ceiling light with an accessible screw-in bulb, the basic steps apply, but a recessed fixture may require you to maneuver around a trim or carefully detach a lens cover. If the bulb is in a socket with a locking ring or a twist-and-lock mechanism, rotate gently while applying even pressure to prevent twisting the base or stripping the threads. For outdoor fixtures, ensure your hands are dry and avoid touching metal components that may be weathered. In fixtures with glass covers, remove the cover first if necessary, to avoid cracking the glass when you loosen the bulb.
If you’re dealing with a bulb that won’t unscrew, apply a light touch with a cloth or use a rubber jar grip for extra torque. Do not use excessive force. If you suspect a broken bulb, turn the power off at the breaker and wear gloves to safely remove the fragment. In any case, keep the room ventilated and avoid using bulbs that produce flicker or unusual hums, as these can indicate compatibility or electrical issues. The key is to stay patient, identify the bulb type, and follow the correct base and wattage.
Note: when you need to change bulbs in hard-to-reach places, a magnetic-lid tool, wand cover, or grabbing device can help you handle the bulb without leaning over the fixture. This approach minimizes risk and helps you avoid accidental contact with hot surfaces.
noteType: null],
Special Cases: Enclosed Fixtures, Dimmers, and LEDs
Enclosed fixtures can trap heat and shorten bulb life if you use the wrong bulb. In most cases, choose bulbs rated for enclosed fixtures and ensure that the bulb’s base and shape match the socket. For dimmed fixtures, only dimmable bulbs should be used, and you may need to match the dimmer type to the bulb type ( incandescent-compatible vs LED-compatible dimmers). If you are replacing incandescent bulbs with LEDs, confirm that the fixture can handle the LED’s lower wattage and heat output. For recessed fixtures, select bulbs with a low profile or flood shapes that distribute light evenly without getting too hot near the housing. If a fixture is hard-wired or completely sealed, you might need to access wiring or use a different hold-down method; in such cases, rely on a licensed electrician.
Always check the label on the current bulb or the fixture’s user manual for maximum wattage and base type. Bulb Fix’s guidance emphasizes choosing the correct bulb for the fixture to avoid overheating or dim lighting problems. If in doubt, pause and consult a professional rather than forcing a bulb into a socket that isn’t compatible.
noteType: null],
Energy Efficiency, Disposal, and Maintenance
Choosing energy-efficient bulbs not only saves energy but can also reduce heat and extend fixture life. LED bulbs are often the most efficient option and come in various color temperatures to match your space. When replacing, make sure the color temperature and brightness (measured in lumens) align with your room’s needs. For outdoor or security lighting, choose bulbs with appropriate brightness levels and weather resistance.
Disposal of bulbs depends on type: most LEDs can be recycled where local programs exist, while fluorescent bulbs require compliant handling due to mercury content. If a bulb breaks, follow local guidance for cleanup to avoid mercury exposure and ensure safe disposal. Regular maintenance includes cleaning fixtures, checking for loose connections, and ensuring no moisture or corrosion is present in the socket area. With these practices, you’ll maintain bright, reliable lighting and reduce waste. Bulb Fix’s analysis shows that thoughtful maintenance improves longevity and reduces emergency replacements.
noteType: null]},
toolsMaterials
Tools & Materials
- Replacement bulb (correct base and wattage)(Match base type (e.g., E26, E27, GU10) and wattage rating; consider LED if fixture supports it.)
- Stable ladder or step stool(Choose one appropriate for your ceiling height; ensure dry, stable footing.)
- Work gloves(Protect hands from sharp edges and avoid transferring skin oils to the bulb.)
- Safety glasses(Recommended if there's risk of glass breakage.)
- Flashlight or headlamp(Helpful for dim fixtures or enclosed spaces.)
Steps
Estimated time: 15-25 minutes
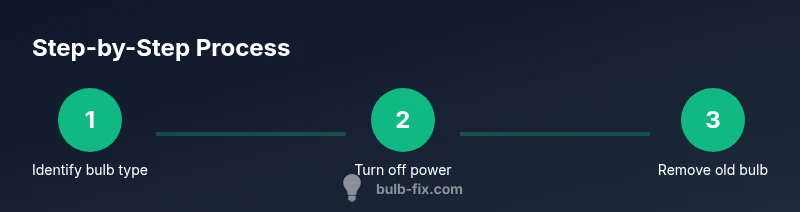
- 1
Identify bulb type and base
Inspect the current bulb and fixture to determine the base type (e.g., E26, E27, GU10) and bulb shape. If the socket is hidden, gently open any fixture cover or glass panel to access the bulb. Confirm whether the fixture is rated for LED or other technologies before purchasing a replacement.
Tip: Take a photo of the old bulb and socket labeling to compare at the store. - 2
Power down and secure the area
Turn off the light switch, and if possible switch off the circuit at the breaker. Wait for the bulb to cool completely, especially incandescent or halogen bulbs, to avoid burns or breaking the glass when you touch it.
Tip: If you’re unsure about the wiring, err on the side of caution and call an electrician. - 3
Remove the old bulb
Grip the bulb gently with gloves or a dry cloth and turn counterclockwise to unscrew if it’s a screw-in base. For pin-based or twist-lock bases, apply even pressure while pulling straight out from the socket. Do not twist too hard to prevent socket damage.
Tip: Support the bulb with your other hand to prevent it from dropping. - 4
Check replacement compatibility
Compare the base, size, and wattage of the replacement with the old bulb and fixture label. Ensure the replacement is rated for any dimmer or enclosure in the fixture. If the base or size differs, you’ll need an adapter or a different bulb model.
Tip: If the fixture is labeled for LED only, do not install incandescent bulbs. - 5
Install the new bulb
Align the base with the socket and insert gently. Turn clockwise until snug, but avoid overtightening to prevent damage to the threads or socket. For pin-based bulbs, insert firmly and rotate only as required by the base design.
Tip: Make sure the bulb sits flush and isn’t protruding unevenly from the fixture. - 6
Test and tidy up
Restore power and test the light. Check for flicker, buzzing, or unusual warmth. If everything looks and sounds normal, wipe the bulb with a dry cloth and replace any fixture covers. Dispose of or recycle the old bulb according to local guidelines.
Tip: Keep a spare bulb in a known location for future changes.
Got Questions?
Do I need to switch off the breaker to change a bulb?
Yes. For safety, turn off the circuit at the breaker and then switch off the light. This reduces the risk of electric shock or arcing while you handle the bulb.
Yes—always switch the circuit off at the breaker before changing a bulb to prevent shocks.
What bases are most common in homes?
The most common bases are the E26/E27 medium screw bases. There are also GU-type bases for spotlights and B22 bayonet bases in some regions. Always check the fixture label or old bulb for the correct base.
Most homes use E26 or E27 bases; check your fixture label to be sure.
Can I replace an incandescent bulb with LED?
Yes, if the base matches and the fixture supports LED. Check for appropriate wattage limits and ensure any dimmer is compatible with LED bulbs.
Yes, you can switch to LED if the base and dimmer support it.
How should I dispose of old bulbs?
Recycle bulbs where possible. Fluorescent bulbs and LEDs have specific disposal guidelines; wrap broken bulbs and follow local regulations for hazardous materials.
Recycle bulbs when you can; follow local guidelines for safe disposal.
What should I do if the bulb won’t unscrew?
Apply gentle, steady pressure. If it’s stuck, turn off power and use a rubber grip or cloth. Do not force or pry, as this can damage the socket.
If it won’t budge, stop and try a rubber grip for extra grip, then reassess.
What safety gear is recommended?
Gloves and safety glasses are recommended; keep the area dry and avoid touching hot surfaces. If you’re worried about breakage, have a bucket handy.
Wear gloves and safety glasses, especially around older fixtures.
Watch Video
Key Points
- Power off before touching any bulb
- Match base and wattage to avoid damage
- Use proper handling to prevent breakage
- Enclosed/dimmable fixtures require compatible bulbs
- Dispose bulbs responsibly and recycle when possible